|
Why should I use
a still camera? Some people ask, why use a still camera for this? Wouldn’t a video camera be more appropriate? The issue is that we want to compress time considerably (30:1 up to 1000:1 or more). To do this we’d need to shoot several minutes of video just to get a few frames for the time-lapse. The rest of the frames are useless and need to be removed in post-production (which can be lengthy). A lot of tape and drive space is required to do this, which can be painful. Some video cameras allow to shoot just one frame at a time, and I guess this would work fine, although I’ve never tried it. Also, individual frames extracted from a MiniDV source don’t hold up very well on their own; they look better in motion. The reason why I favor a still camera is that in terms of creating the final movie file, it’s easier to assemble a series of still frames than to extract frames from an existing movie. If you’re wondering about this, look at the movie creation and post-production section. The other advantage is the image quality. Having a little extra resolution allows for less noise in the final result, and also provides the possibility to pan or crop the image. Using Cameras for Time-Lapse Exposures Here I've got a few examples on which cameras to use for time-lapse photography and how to connect them to controllers (which are explained in the next section). This is by no means an exhaustive list; it's just what I've tried succesfully. Connecting Digital SLRs - Dedicated plugs make life easier. Connecting Prosumer Point & Shoots - If you look close enough, you might find a hidden connector. Connecting Cheap Point & Shoots - With a little work this'll work on just about any camera! If you're wondering if there are different options to connect your camera, click here. Connecting Digital SLRs I've tried two cameras: the Canon Digital Rebel XT and the Canon 10D/20D. These can be connected easily by a dedicated plug or by USB via a controller application. As I mentioned earlier, the Digital Rebel XT has a 2.5mm / 3/32" stereo jack connection for its remote control (similar to a headphone jack, but smaller). Obviously, this is fairly easy to find. 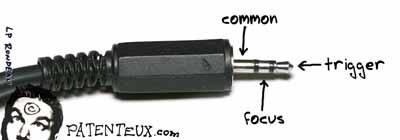 If you’re wondering which wires to
connect, it’s pretty simple. There
are 3 sections on a stereo plug: the base (next to the plastic
connector) – which is the ground, the middle – which triggers focus and
the tip, which triggers the shutter. So linking the tip with the base
triggers the shutter, and linking the middle with the base focuses the
shot (which is nice but not necessary useful for time-lapses). If you’re wondering which wires to
connect, it’s pretty simple. There
are 3 sections on a stereo plug: the base (next to the plastic
connector) – which is the ground, the middle – which triggers focus and
the tip, which triggers the shutter. So linking the tip with the base
triggers the shutter, and linking the middle with the base focuses the
shot (which is nice but not necessary useful for time-lapses).Some cameras (such as the Canon 10D, 20D and 30D) use a dedicated plug, which can usually be found only on wired remotes sold by the manufacturer (they’re sometimes pretty expensive). You can always buy one of these remotes and cut the cord – or better yet, just add a plug in the middle to split it (I suggest a male and female stereo 1/8 plug and jack). You can also get really cheap knockoff remotes on eBay, which won’t hurt as much when you cut the cord. Some people have also posted different tricks on forums on how to make your own (such as hacking an Atari controller cable to make it fit). Connecting Prosumer Point & Shoots 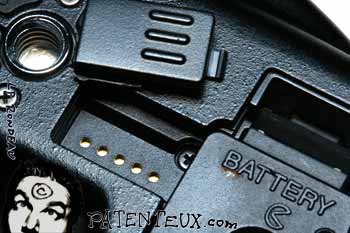 Some
cameras have hidden interfaces, such as cameras with an
accessory battery grip. I’ve found that under my Nikon Coolpix 5000,
there is a little trap door that reveals a few contacts (which are
designed to provide shutter control to a battery grip). Since the
shutter button is just a switch, you can try touching two contacts with
a wire (thus closing the contacts). Experiment with different pairs and
you’ll eventually get it. In the case of the Coolpix 5000, linking pins
2 and 5 from the left triggers the shutter. Some
cameras have hidden interfaces, such as cameras with an
accessory battery grip. I’ve found that under my Nikon Coolpix 5000,
there is a little trap door that reveals a few contacts (which are
designed to provide shutter control to a battery grip). Since the
shutter button is just a switch, you can try touching two contacts with
a wire (thus closing the contacts). Experiment with different pairs and
you’ll eventually get it. In the case of the Coolpix 5000, linking pins
2 and 5 from the left triggers the shutter.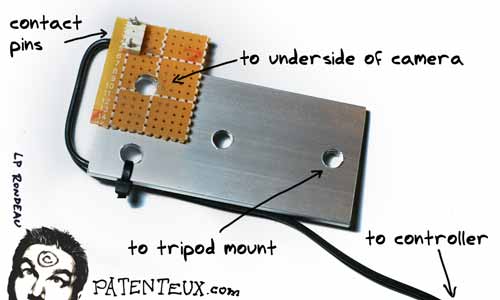 In this
case I sniffed around in an electronics shop to find a way to
link the two pins in order to connect the invervalometer to it. Here’s
a picture of the resulting connection. It’s not pretty, but it works. In this
case I sniffed around in an electronics shop to find a way to
link the two pins in order to connect the invervalometer to it. Here’s
a picture of the resulting connection. It’s not pretty, but it works.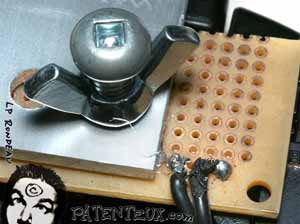 Connecting Cheap Point & Shoots 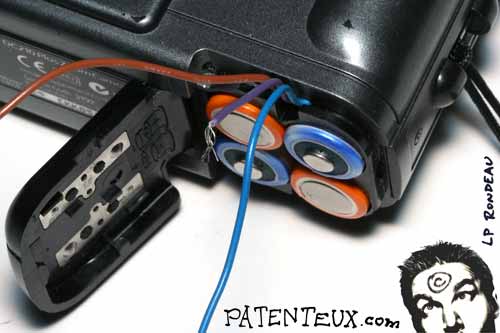 Time-lapse photography doesn’t need to be done with a
top-notch camera.
Any old camera will do. In this case I found an aging Kodak DC210 that was being
thrown away at the
office! To get a physical connection for a contact closure, the best
way I found is to disassemble the camera and solder small wires on the
shutter button terminals. Touching the wires triggers the shutter. The
wires stick out through the battery
compartment, so I can hide them if necessary. Time-lapse photography doesn’t need to be done with a
top-notch camera.
Any old camera will do. In this case I found an aging Kodak DC210 that was being
thrown away at the
office! To get a physical connection for a contact closure, the best
way I found is to disassemble the camera and solder small wires on the
shutter button terminals. Touching the wires triggers the shutter. The
wires stick out through the battery
compartment, so I can hide them if necessary.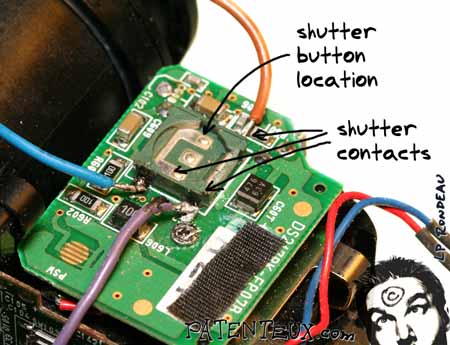 Do NOT try
this on a camera you still use actively. If you can live
with the possibility of rendering the camera useless, then go ahead and
try it. I tried it on this one and it works great. Obviously it doesn’t
have a very good shot-to-shot time, and low-light pictures are really
noisy, but it still makes for some really interesting clips. Also, it’s
nice to have a camera that can be used where we wouldn’t dare using
another camera out of fear of getting it stolen or damaged. Do NOT try
this on a camera you still use actively. If you can live
with the possibility of rendering the camera useless, then go ahead and
try it. I tried it on this one and it works great. Obviously it doesn’t
have a very good shot-to-shot time, and low-light pictures are really
noisy, but it still makes for some really interesting clips. Also, it’s
nice to have a camera that can be used where we wouldn’t dare using
another camera out of fear of getting it stolen or damaged.Click a heading above or just click NEXT PAGE. |